Issue 27, January 2006
Is Total Caries Removal Contraindicated?
Dear Fellow Bondodontists,
Thanks for your tremendous support last year. Our seminars continue to grow, thanks to your attendance and referrals. Also, thanks for all your kind mail and e-mail. It is really heartwarming to hear about all the clinical successes; that is what keeps me in the seminar business these days.
You might be interested to know that a typical seminar has repeat attendance of over 70%. I know that would not happen if you were not having clinical success!! Mary and I are trying to figure out what it takes to motivate those who have not attended. Where do they get their CE? What kind of dentistry are they practicing? If you have any ideas, please let me know. ([email protected] or www.adhesion.com)
We don't pretend to have the only good seminar; there are lots of them. However I am proud to be stressing minimal invasion consistent with meeting the patients esthetic expectations. I see far too much teaching of highly invasive techniques, certainly not in the patient's best interest. Much of this appears to be commercially driven.
In 2005, we had two awesome guest speakers. First, Dr. Geoff Knight at Hawaii and Tahoe. Geoff's highlight for me was his silver iodide arresting of caries. This presents a serious challenge to the Healozone (KaVo) concept. (Neither technology is available in the USA at present.) Then at Yosemite, Prof. Van Thompson, now of NYU. Van further expanded on caries removal, further explaining why total removal of caries may be contra-indicated. Is this heresay or what? Just remember total etch and how that was perceived by the "experts" when it was introduced!! You can learn more about Geoff's concepts at www.dentalk.au and about Van's lecture on www.tinmandental.com (click on downloads, presentations).
This year we are proud to present Dr. Ron Jackson at Yosemite. Ron really needs no introduction, being one of the masters of direct resin dentistry. The dates are November 2-4. Be warned, this one is likely to sell out due to the speaker and the location. Early November is great at Yosemite, no crowds, trees in autumn colors, and hopefully the first storm to feed the falls. There is no snow this early. Mary has negotiated some great room rates at Yosemite.
Tahoe, southshore, at Stateline is on for October 14 at Harvey's. The guest speaker will be Dr. Jerry Denehy, the mentor for many of the top resins dentists worldwide. We have not yet scheduled Hawaii. Watch the web site for an announcement. (www.adhesion.com).
Have a great year.
Sincerely,
Ray Bertolotti
Porcelain Veneers 20 Years Later
Now that we are approaching 25 years experience with bonded porcelain veneers, we really know a lot about them. We know what prep results in the strongest veneers, we know how strong they really are and we know that they can last for a very long time.
The biggest clinical problem I have encountered with veneers is the try-in materials. I have avoided the use of try-in pastes for two reasons. First, glycerin based try-in pastes are generally very poor representations of the final composite shades. Some brands are better than others, but most are terrible. Second, glycerin based try-in pastes are sources of veneer contamination. Unless thoroughly removed, they will weaken the bond strength of composite to the HF etched porcelain veneers and can often result in a complete de-bond. Now there is a revolutionary try-in system that allows us to dial-in the shade, eliminating the try-in problems.
The biggest clinical problem I have encountered with veneers is the try-in materials. I have avoided the use of try-in pastes for two reasons. First, glycerin based try-in pastes are generally very poor representations of the final composite shades. Some brands are better than others, but most are terrible. Second, glycerin based try-in pastes are sources of veneer contamination. Unless thoroughly removed, they will weaken the bond strength of composite to the HF etched porcelain veneers and can often result in a complete de-bond. Now there is a revolutionary try-in system that allows us to dial-in the shade, eliminating the try-in problems.
Longevity of Veneers
I have personally placed thousands of porcelain veneers since I was introduced to the concept1 by Dr. John Calamia in 1983. So how long do veneers last? In my practice, a very long time, at least as long as crowns. The most common reason for replacement is gingival recession, mostly after 10 years of service. The second most common reason is the patient wanting to upgrade to even whiter veneers. (Ten years ago, shade A2 was normal. Now it's whiter than B1.) Fracture has been rare and de-bonding non-existent. I estimate that the rate of fracture is around 2% at 10 years. Fracture most often occurs at the incisal edge, from trauma, or at the cervical area when the veneer is bonded to dentin, presumably from tooth flexure. This result compares favorably to all-porcelain crowns and PFM crowns.
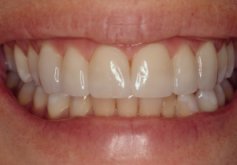
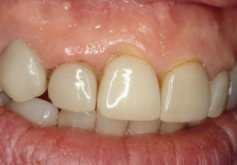
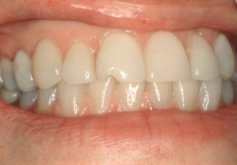
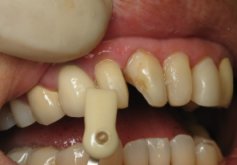
Here are two representative long-term veneer recalls. One is 21 years recall and the other one 14 years. The 14 year case (shade A2) is holding just fine but the older one showed excessive gingival recession and the veneers were consequently replaced. Since the veneer preps were only in enamel, removal and remake was done without anesthesia. The third picture is a porcelain veneer that was chipped by bumping with a Coke bottle after 9 years of service. Fortunately, sectional porcelain was able to repair this one and it's still looking good after 6 more years. (The procedure for bonding sectional porcelain has been in my seminars for years now; if you are not familiar with the technique let me know and I can e-mail it to you.)
Here are two representative long-term veneer recalls. One is 21 years recall and the other one 14 years. The 14 year case (shade A2) is holding just fine but the older one showed excessive gingival recession and the veneers were consequently replaced. Since the veneer preps were only in enamel, removal and remake was done without anesthesia. The third picture is a porcelain veneer that was chipped by bumping with a Coke bottle after 9 years of service. Fortunately, sectional porcelain was able to repair this one and it's still looking good after 6 more years. (The procedure for bonding sectional porcelain has been in my seminars for years now; if you are not familiar with the technique let me know and I can e-mail it to you.)
Pressed Ceramic vs. "Feldspathic" Veneers
More than 95% of my veneers are fabricated with "feldspathic" porcelain, that is from a porcelain slurry brushed onto foil or a refractory model and then fired. These feldspathic veneers are in contrast to what we call pressed ceramics. The most commonly used porcelains for my veneers are Ceramco 2, Noritake, d-Sign, and Finesse. (Some of these porcelains are not technically "feldspathic", since they are not made from the mineral feldspar. However they are fabricated like feldspathic ones.) The reason that I choose feldspathic veneers in that they can be made thinner than pressed ceramic with more than one color of porcelain throughout the veneer. Pressed ceramics rely on surface color to produce multi-hued veneers. Unfortunately if I grind the surface to re-shape the veneer, as I often do, this surface color is lost. I reserve the use of pressed ceramic for veneers that are around 1 mm thick or more (say, a peg-shaped lateral incisor). The pressed ceramics seem to have a better chameleon quality for these thick veneers, very useful when a shape change but not a color change is desired. My veneers average 0.5 mm in the thickest places. That is roughly half of the enamel thickness, allowing the tooth preparation to be entirely in enamel. There are obvious advantages, including no need for anesthesia for the preparations nor for the bonding procedure. Pressed ceramics generally need a lot more tooth reduction.
So why are pressed ceramics seemingly more popular than feldspathics? I think it is due largely to commercially driven teaching institutes who are in cahoots with the pressed ceramic manufacturers. Another factor, as I am told, is that it is easier to train a technician to make pressed ceramic veneers than to make feldspathic veneers. Yet another factor may be that some dentists expect a veneer to be a lot like a crown, that is final in color when delivered, no matter how it is bonded. Only thick veneers can accomplish this objective. However they rarely do; when was the last time you received a perfect single central incisor crown or thick veneer? Thin veneers are translucent and are meant to be "dialed-in" for color at chairside, something you can't do with thick veneers. I find the dial-in capability to be a great advantage, allowing me to match almost anything. With a single veneer, the final dial-in of a thin veneer is usually easy! All you need is the right veener bonding system and ideally a perfectly shaded try-in system.
So why are pressed ceramics seemingly more popular than feldspathics? I think it is due largely to commercially driven teaching institutes who are in cahoots with the pressed ceramic manufacturers. Another factor, as I am told, is that it is easier to train a technician to make pressed ceramic veneers than to make feldspathic veneers. Yet another factor may be that some dentists expect a veneer to be a lot like a crown, that is final in color when delivered, no matter how it is bonded. Only thick veneers can accomplish this objective. However they rarely do; when was the last time you received a perfect single central incisor crown or thick veneer? Thin veneers are translucent and are meant to be "dialed-in" for color at chairside, something you can't do with thick veneers. I find the dial-in capability to be a great advantage, allowing me to match almost anything. With a single veneer, the final dial-in of a thin veneer is usually easy! All you need is the right veener bonding system and ideally a perfectly shaded try-in system.
Preferred Tooth Preparation
Fortunately we have some good research on tooth preparation. Castelnuevo et al.2 found that 2 mm of free standing porcelain produced the strongest veneer and furthermore that a lingual chamfer actually reduced strength compared to a lingual butt joint. This is great news since it is easy to prepare for 2 mm of porcelain and a lingual butt joint. Just hack off some incisal tooth and leave the lingual margin as-cut. Just be sure to round the facial-incisal angle after you prepare the facial reduction. (Of course if the tooth is worn, you will need to reduce the incisal less that 2 mm since you are planning for 2 mm of porcelain.) The facial-incisal preparation allows for various paths of insertion and for extending into the gingival interproximal areas.
A very nice paper by Magne and Douglas3 stated "each subsequent reduction in tooth structure resulted in a substantial increase in crown flexibility, even after restoration" and "veneered incisors should be considered to be similar to natural teeth and restored accordingly." Let's consider what they are saying. The more tooth reduction, the more the restored tooth will flex. We definitely don't want the tooth to flex since that potentially results in cracked porcelain. In their paper, they show that even a small fraction of remaining enamel will substantially stiffen the restoration compared to total enamel removal. With roughly 1 mm of facial enamel available on a typical incisor, that means a typical prep for pressed ceramic would remove all the enamel. By contrast, about half the enamel need be removed for a feldspathic veneer. So it makes a lot of sense to conserve some enamel for reasons of strength, never mind the other obvious advantages of being in enamel.
Note also their last statement, concerning strength. Hence, I do not provide night guards for reason of preventing fracture of the veneers since the veneered teeth should be "similar to natural teeth".
Revolutionary Try-in System
For the reasons mentioned above and as many of you know, I have historically avoided the use of try-in pastes. Instead I have used the real composite for try-in. This procedure limits the try-in time and sometimes does not allow enough time for the patient to "buy the shade". It seems like every time I hear about a total veneer debond (I have had none, that's zero!!), there is some try-in paste issue to blame.
Well, Danville's innovation to the rescue! Danville just introduced a revolutionary try-in composite, called Accolade PV Try-in. Since it is a composite, it matches the Accolade PV veneer bonding composite. The difference is that the Try-in version has drastically reduced amounts of light sensitive catalysts whereas the bonding composite has the customary amount of catalyst. After try-in, the Accolade PV Try-in composite need not be completely removed. It will polymerize when it comes in contact with the fully catalyzed Accolade PV composite. Awesome!! No more glycerin contamination issues. No more off color try-ins. Plenty of try-in time.
The Accolade PV shades were developed in consultation with Dr. Tom Hughes. Dr. Hughes is one of America's greatest cosmetic dentists. Many of you know Tom from the Smile after Smile albums. (They are now sold by Smart Practice.) Tom found, as I confirmed, that only 3 shades of composite will suffice for dialing-in most feldspathic veneers. (These shades are Translucent, Light, and Extra Light.) Yours truly designed the two "darkening" shades, Yellow and Brown, which are not used as often as the other 3 shades but sure are handy when you need them. It is most interesting to note that DaVinci lab (famous for great feldspathic veneers) has a veneer bonding kit with nearly the same shades. They call theirs Bright, Brighter, Brightest and finally Ludicrous Bright. The equivalent ludicrous shade is also in the Accolade PV kit, called White Opaquer, a shade that I think would not be used by itself. It was designed as a blending shade and for pre-impression "block-out" of heavy tetracycline cases.
You can purchase the Accolade PV kit from any Danville dealer. One dealer which has it in stock is Tin Man Dental, 800-554-6394 or www.tinmandental.com
The New Veneer Plan and Cooperating Labs
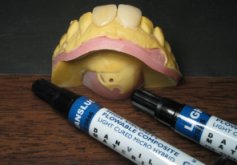
So here is the new veneer plan: Specify to the lab the final shade desired, the prep shade (often Ivoclar/Vivadent's "Die Stumpf" guide is handy for this one) and provide quality impressions. That is all they will need. I know four labs that have agreed, upon request, to simulate try-in at the lab with Accolade PV Try-in on a tooth colored prep replica, and inform you of the shade of Accolade PV to use. That is the biggest simplification ever in doing veneers!! The four labs are Denton in Southern California (877) 356-2317, Cardinal in Northern California (800) 443-6444, Andreou-ADL in upstate New York (888) 285-4110 and Lord's in Wisconsin (800) 821-0859. I bet that many other labs will follow this procedure now that we have a great try-in composite.
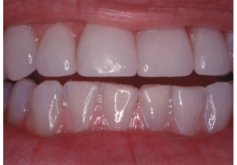
The shade taking and lab try-in procedures are illustrated below:
The shade taking and lab try-in procedures are illustrated below:
References
- Calamia JR, Etched Porcelain Facial Veneers, NYJ Dentistry 1983; 53:255-259.
- Fracture load and mode of failure of ceramic veneers with different preparations. Castelnuevo et al, J Pros Dent 2000;83:171-180. (reprinted in Feb 2004 California Dental Assn Journal, pages 167-177.)
- Magne P and Douglas W, Cumulative effects of successive restorative procedures on anterior crown flexure: intact vs. veneered incisors, Quint Inter. 2000,31:5
Contact Wedge
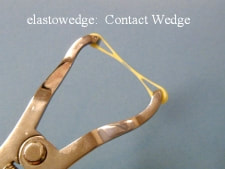
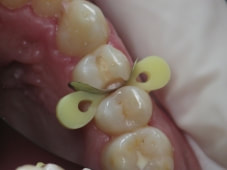
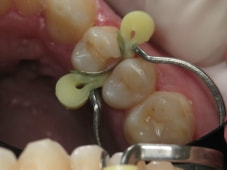
Here is another innovation, this one patented by Dr. Tom Hughes. It is the "elastowedge", actually trade named Contact Wedge by Danville. The wedge is a very stretchable wedge that is placed with a rubber dam type forcep. When released, it enlarges in the mesial-distal direction. It thereby adapts the matrix against the tooth, even into a concavity if one is present, something a conventional wedge can't do.
The elastowedge will not separate teeth. Tooth separation relies on using the Contact Ring or a similar device such as Palodent or Garrison rings. Danville is producing a dedicated forcep that will allow easy placement of the elastowedge. Forcep production is expected to be completed in late February. Danville dealers can supply the elastowedge right now. While awaiting the dedicated forcep, it is usable on a rubber dam forcep with some difficulty.
The elastowedge will not separate teeth. Tooth separation relies on using the Contact Ring or a similar device such as Palodent or Garrison rings. Danville is producing a dedicated forcep that will allow easy placement of the elastowedge. Forcep production is expected to be completed in late February. Danville dealers can supply the elastowedge right now. While awaiting the dedicated forcep, it is usable on a rubber dam forcep with some difficulty.
Prelude Link
As many of you know, SE Bond (Kuraray) is the gold standard in bonds. The big challenge is from Prelude SE. What makes Prelude more interesting than SE Bond is that Prelude is compatible with all composites, whether light-cure, self-cure or dual-cure. SE Bond is strictly for light cures. Prelude is used just like SE Bond for light cure applications. However Prelude includes a product called "Link", which may be used as a third layer to convert the Prelude to compatibility with self cure composite and dual cure composite when it will not receive light down to the bond area. Link also works very well with SE Bond, eliminating the incompatibility with products like Core Paste.
I am making the following recommendation in the seminars. If you have been using Clearfil SE Bond, it is very likely that you are highly successful. It makes no sense to change. Just add Link to your armamentarium and use it with SE Bond when you want to place a dual-cured composite like Starfill 2B (Danville), Luxacore (Zenith/DMG) or Core Paste (DenMat) or Rock Core (Danville).
If you don't now use SE Bond, you would be well advised to start using Prelude SE. The performance of SE Bond and Prelude SE is comparable. Prelude is less expensive. SE has a longer track record. Tin Man sells all these materials; that would be a good place to get good technical advice (800) 554-6394.
Bonding: Is simpler Better?
My good friend, Dr. Gordon Christensen recently said "Total etch is dead". He is advocating use of self-etching primers rather than separate etching. I fully agree but we need to be especially careful of which self-etching material we select. All self-etching primers are not created equal!
There are two main strategies for self-etching primers. There are two-layer (what I call EP + B) and the all-in-one (EPB) materials. (The E refers to etch, P to prime, and B to bond.) Two subgroups of the EPB's are mix (two component) and no-mix (just one bottle). I have not found a no-mix EPB that performs well enough to make it acceptable to me. The leading mix type EPB products are One-Up Bond F (Tokuyama) and Prompt L-Pop (ESPE, 3M). These are good performers. However, as with all EPB products, they have an inherent problem called "transudation". This transudation is permeation of pulpal fluids through the hybridized bonding zone in the tooth. Transudation is through "water trees" in the hybrid zone. These water trees are created by the water that is contained in the self-etching primer. Without a second water-free Bond layer, transudation occurs. With the second "B" layer of the EP+B bonding agents, no transudation is seen. On the cover page are pictures of vital teeth covered with EPB and EP+B bonds. The EPB example exhibits transudation but the EP+B does not. Obviously the seal is in question when there is transudation.
Additionally, with the EPB's, the strength of the bonding agent to composite interface is time dependent. If light curing is delayed after placement of the composite, strength will suffer. Pulpal fluid pushes the composite off the tooth. This is a current seminar topic and way beyond what I can write up in detail here. I will expand this section on the web site www.adhesion.com for those who can't attend my seminars.
So the "short answer" recommendation is to stay with the EP+B products. If you want self-etching, my recommendations are SE Bond (Kuraray) or Prelude (Danville). Consider adding Prelude Link (Danville) to make stocking a separate bonding agent for dual-cure applications unnecessary.
Porcelain Veneer Speed-Bonding
From the current seminar handout, my latest veneer bonding recommendations:
This is a specific procedure which utilizes Accolade PV's unique Try-in composite (patent pending). To obtain the absolute maximum try-in time, use the directions that are in the Accolade PV kit. In those directions, no light curable bond is placed on the silane. Instead only Accolade PV Try-in is used and then later mostly removed by mixing with Prelude #2. That procedure is excellent but I choose to use my Clearfil Photo Bond routine here, due to its long track record and dual-cure, but I do sacrifice some try-in time.
This is a specific procedure which utilizes Accolade PV's unique Try-in composite (patent pending). To obtain the absolute maximum try-in time, use the directions that are in the Accolade PV kit. In those directions, no light curable bond is placed on the silane. Instead only Accolade PV Try-in is used and then later mostly removed by mixing with Prelude #2. That procedure is excellent but I choose to use my Clearfil Photo Bond routine here, due to its long track record and dual-cure, but I do sacrifice some try-in time.
- Before trying in the veneer, apply a silane [Rely X (3M), S-Bond (Danville)] to the uncontaminated, fluoride etched veneer. Follow the silane manufacturer's instructions (sometimes an acid wash is necessary with the particular silane but not with 3M or Danville, a great convenience). Next, coat the silaned veneer with an unfilled, light curing, "enamel- bonding" resin [Enamel Bond (3M), Visar Seal (DenMat), or E-Bond (Danville)]. Don't cure. Avoid dual cured resins, especially Photo Bond, for this step in substitution for the light cured one since they may cause premature composite setting problems. The silane is now "locked in" by the unfilled resin and is permanently attached, unless dissolved in solvents such as alcohol.
- Try the resin coated porcelain veneers for fit both individually and in adjacent groups on the unetched teeth. The unfilled resin protects the silane from contamination. After try-in, just brush off the resin with a dry brush, if contaminated, and brush on fresh resin. (In extreme cases, ultrasonically clean the veneer in ethyl alcohol and begin again with the silane step.)
- Choose the desired shade of Accolade PV Try-in composite and place on inside of veneer to check shade on unetched tooth. [If you are not using Accolade PV, you will need to follow the manufacturers directions for try-in paste, especially noting how it is removed after try-in.] I usually try-in Accolade PV Try-in "Translucent" shade first; it is acceptable about 90% of the time. If the color needs to be modified, remove the veneer. Just wipe off the first try-in composite with a clean brush and change to the new shade. Try-in again. I find that when the first try-in does not produce an acceptable shade, slight white opaquing is usually needed (the tooth shows too much). Accolade PV has two excellent pre-opaqued whitish "veneer shades", Light and Extra Light, which greatly simplify this procedure. They usually eliminate the need for a custom mix. One of these two shades nearly always produces an acceptable try-in when the Translucent does not. In the rare event that the veneer needs darkening, just use a dark shade of flowable composite or the Accolade Brown or Yellow shades, or perhaps a blend of these. In addition to the 5 PV shades, Accolade PV has a White Opaquer shade that is intended for custom blending. It is the "super white and opaque" blending shade used at Danville to produce Light and Extra Light PV shades. Especially to be avoided for veneers are relatively high viscosity composite resins. They require excessive pressure to seat the veneers (veneer cracking problems), easily tear and form bubbles (black staining problems later).
- Isolate, when necessary, with retraction cord [Ultradent #0 cord preferred], immersed in Visine if necessary for hemostasis. (Visine will not form a black sulfide stain at the margin like Astringident and other ferrous sulfates do.)
- Clean try-in resin off the enamel surfaces, using pumice in a rubber cup. Avoid gingival contact to prevent bleeding. A Kincheloe "Retract" instrument (Danville or Tin Man) is a handy way to protect and retract the gingival tissue. Rinse with water and dry with oil-free air.
- Brush at least 50% or Accolade PV Try-in composite off veneers and replace with the fully catalyzed Accolade PV. Complete removal is not required.
- Isolate teeth to be veneered with interproximal strips to protect adjacent teeth (not being veneered) from the etchant.
- See next step if using a self-etching system such as SE Bond. Otherwise etch tooth, wash and dry (assuming Photo Bond is being used).
- Place one coat of Photo Bond on the etched tooth and air thin. If the prep is all or mostly all dentin and the veneer is fully light curable, then you may use self-etching SE Prime, then SE Bond, rather than etch and Photo Bond. Also Prelude SE works well. Note that with SE Bond, everything must be cured at once; no pre-curing of the SE Bond is permitted since it thickness would preclude proper veneer adaptation to the tooth. Prelude SE, being much thinner, may be light cured in advance of placing the veneer if care is taken to prevent pooling (air thin before curing).
- Remove matrix strips prior to placing veneers on teeth. This step assures complete and passive seating of the veneers, even in multiples.
- Gently place the veneers on the tooth, preferably all at the same time, and tack in center with small curing light perpendicular to facial surface, avoiding the margins. (The 3 mm diameter Demetron tip is ideal and takes 2-3 sec to spot cure.) After tack has fully cured, cure the other margins for about 1-2 seconds. Remove the resulting "jello" using a curette. Slide a metal matrix band mesial and distal of one tooth at a time and cure. The metal bands should be placed at the mesial and distal contacts of each tooth individually, preventing difficulty due to additive thickness of more than two bands at a time. To be avoided is placing a matrix prior to placing the veneer on the tooth. Pressure from the matrix will push on the veneer, forcing compensating seating pressure which results in broken veneers. If absolutely necessary, plumber's teflon tape makes a good matrix.
- Cure the entire veneer fully (slowly at first) with the matrix bands removed. Avoid high intensity lights such as PAC lights unless you desire the look of "characterized", cracked veneers.
- Finish gingival margin resin flash with a "new" twelve fluted carbide bur (usually a 7901), if necessary, and finish interproximal with G-C New Metal strips, 600 grit (GC Dental). If you need to break the contact, the Horico Safe Sided Saw blade works well. Also the DenMat Cerisaw. For the gingival margin areas, Danville's Stainbuster (Flashbuster) also works very well to remove any excess composite with no risk of damage to the veneer. If there is risk of oxygen inhibited, unpolymerized composite at the margins, it is wise to place a layer of an oxygen barrier (such as Liquid Lens or Deox) and light cure through that barrier.
- Polish exposed margins using thin, flexible polishing discs. Diamond medium grit "Flexis" disks (Vident) work well when it is necessary to trim or reshape the porcelain. Use rubber porcelain polishing cups/points such as Brasseler's "Dialite" cup and wheel to polish the porcelain.
