Dear Fellow Bondodontists,
Many of you have noted a lack of Fifth Quarter programs for early 2008. Thanks for asking about the schedule. We have been concentrating on some overseas travel and will get back into the domestic seminar mode beginning with Lake Tahoe on June 21.
The guest speaker at Lake Tahoe will be Geoff Knight from Australia. Geoff is one of the greatest innovators in dentistry. He will be focusing on making the right choices in restorative materials and bonds along with his pharmacological approach to caries management. Geoff hates lab bills so he has mastered the art of doing just about everything direct.
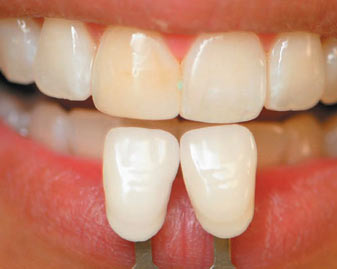
The Yosemite program on October 30-November 1 will feature Prof. Ed McLaren from UCLA. Ed will be speaking on many new ceramic systems: low fusing porcelains, pressable glass systems, and CAD-CAM systems. Clinical guidelines for use of these new systems will be given. Indications will be given for no prep veneers and for dealing with more aggressive solutions when dentin must be exposed. The presentation covers the most effective use of computerized shade taking systems. Comparisons will be made to visual shade taking. Included is the use of new shade guides and how to effectively communicate the shade with the laboratory.
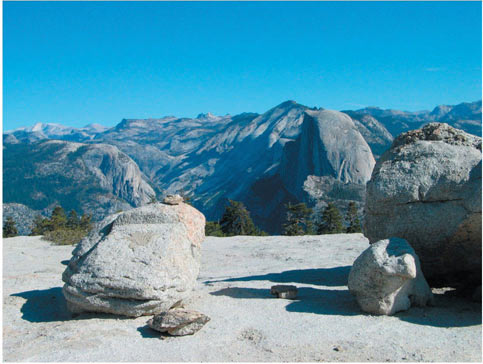
The Yosemite seminar is held at the Ahwahnee Hotel where Mary negotiated some very good room rates, not generally available to the public. The early November dates have proven to be excellent times for visiting Yosemite. In 2007, the Glacier Point road was open and the views were simply spectacular. We hiked up Sentinel Dome which is off the Glacier Point road. (See below.)
After a highly successful Alaska cruise in 2007 (spotting lots of whales, even while in port, as shown above!), Dave Winkler and I will most likely be doing an encore in July, 2009. This time it will be in the Baltics, most likely departing from Copenhagen.
Have a great 2008. Stay Bonded!
Sincerely,
Raymond L. Bertolotti
Have a great 2008. Stay Bonded!
Sincerely,
Raymond L. Bertolotti
Base or no base for posterior composites?
As most of you know, I have never recommended the use of bases or liners under posterior composites. My mentor, Professor Fusayama, called these bases “useless”. However, the desirability of bases and liners continues to be controversial.
Some clinicians claim that a base can be beneficial for fluoride release. I have my doubts since fluoride release of resin-modified glass ionomers, the most commonly used base, is short lived. Others claim the base can reduce sensitivity to bite pressure. That’s true but the use of self-etching primers has totally eliminated the problem of sensitivity.
Well, we finally have the definitive study, from a group at Nijmegan University (Opdam et al., J Adhesion Dent 2007;9:469-475). Nijmegan is an amalgam free dental school! They investigated longevity and reasons for failure of Class II posterior composite restorations (PCR’s) with or without a lining. The lining was either Vitrebond (3M/ESPE) or GC Lining (GC). Clearfil Photo Bond was the adhesive, applied after phosphoric acid etching. The result was that PCR’s placed with the liners clinically showed more frequent fracture than PCR’s placed with no liner. Survival rates at 9 years were 70.5% with liner and 88.1% with no liner. What is the reason for the difference? I will speculate that both poor adhesion and poor mechanical properties of the liners, both inferior to composites, were responsible.
There is a use for GIC (not resin modified GIC) liners which I actually recommend. That is Fuji Triage (known as Fuji VII overseas) as a liner when residual caries or questionable dentin remain in the preparation. The Fuji Triage assists remineralization of carious dentin to a fluoride-rich form of dentin that I call “super dentin”.
Super dentin is highly resistant to recurrent de-mineralization. In most such cases, the filling is quite thick so the mechanical properties of the composite are less critical than for average thickness fillings. Additionally, GIC bonds to carious dentin better than bonding agents. This is a topic that Geoff Knight will cover at Tahoe.
Geoff and I both prefer to treat the tooth with ozone before placing the Fuji Triage. The ozone is thought to break down the biofilm, to allow better fluoride transfer from the Triage into the tooth.
Veneer prep: minimum, maximum, or not at all?
I continue to be appalled by what I see in some journals about supposedly necessary tooth reduction for porcelain veneers. I see too many commercially-driven examples of “preparing the tooth to fit the pressed ceramic” rather than selecting a ceramic (perhaps feldspathic or thin pressable) to fit the minimally prepared tooth.
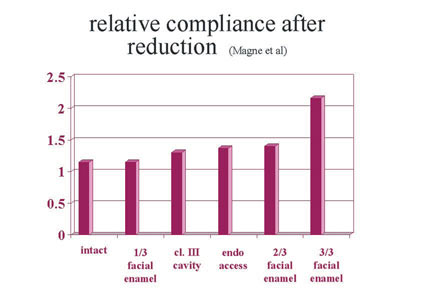
One should avoid heavy reduction to prevent the tooth/veneer complex from being too compliant 1,2,3,4, which according to Hooke’s law, will stress the bonds unnecessarily. Leaving about ½ of the facial enamel would reduce the tooth compliance significantly 4. Besides, bonding to enamel rather than dentin is clearly desirable, for obvious reasons. The illustration above shows how the tooth compliance increases with tooth reduction. Note that a class III filling does not have as much impact as heavy facial enamel reduction so placing a margin on a class III filling is usually preferred to heavy interproximal reduction.
Bonding a veneer to a class III filling and enamel simultaneously is no problem at all; just sandblast and use Clearfil Activator, mixed with a Clearfil adhesive. I have been teaching this technology for over 20 years now. Amazingly, it has remained a well kept secret outside my informed seminar group 5.
“No prep” veneers may have some indications for use. I am thinking of lingually tipped teeth or peg shaped lateral incisors. However I have not seen very many that look really good on normally positioned teeth. Of course there is potential for periodontal problems due to overcontour. At the opposite end of the spectrum, when we consider that the need for subsequent endodontic treatment is directly related to the amount of tooth removed in the preparation, conservative preparation is highly desirable 6.
References:
- Magne P, Douglas WH. Optimization of resilience and stress distribution in porcelain veneers for the treatment of crown fractured incisors. Int J Periodont Rest Dent 1999; 19(6):543-553.
- Magne P, Versilius A, Douglas WH. Rationalization of incisor shape: experimental-numerical analysis. J Prosth Dent 1999; 81(3):345-355.
- Castelnuevo et. al., Fracture load and mode of failure of ceramic veneers with different preparations. J Prosth Dent 2000; 83:171-180.
- Magne P, Douglas WH. Cumulative effects of successive restorative procedures on anterior crown flexure: intact versus veneered incisors. Quint Int 2000; 31(1):5-18.
- Bertolotti RL, Bonding to Porcelain. PPAD 2005; 17(3)232.
- Zollner A and Gaengler P. Pulp reactions to different preparation techniques on teeth exhibiting periodontal disease. J Oral Rehabil. 2000 Feb;27(2):93-102.
Dialing-in the color of a single, anterior veneer
Now let’s look at a conservative veneer preparation of a single central incisor, dialed-in at the bonding appointment for excellent color match. The bonding composite is Danville’s Accolade PV with its revolutionary Try-In Composite. The facial preparation is about 1/2 way through the facial enamel. The incisal reduction is about 1.5 mm., (for strength, 2 mm may be stronger according to Castelnuevo, mentioned above). The lingual margin is a butt joint, not a bevel, since a bevel actually reduces the strength of bonded porcelain veneers.
For try-in, silane is placed on the HF lab-etched veneers while they are clean. Then Accolade PV Try-In Composite is added to the silanated veneer. The veneer is tried in for fit and color simultaneously. Accolade PV Try-In is real composite but has no light sensitive initiators, thus allowing accurate color evaluation with unlimited
try-in time. Using a polymerizable try-in composite rather than a glycerin based try-in material not only speeds the procedure but also eliminates the possibility of contamination by the try-in material. After try-in, the trick is that only 50% of the Accolade PV Try-In Composite need be removed. By adding normal catalyzed Accolade PV, the remnant Try-In Composite is polymerized by what’s known as “diffusion polymerization” when veneer is light cured. This try-in concept is unique in the industry and is very highly recommended.
For further efficiency of try-in, instead of two try-ins of one veneer, simultaneously use two shades of Try-In Composite. By observing the two shades side by side, the final shade may be “dialed-in”. It might require a blend of shades or perhaps one is satisfactory. If there are two veneers, it may be best to try-in with different
shades on each veneer. Sometimes it works to try-in a “right half” and a “left half” on a big case. The unlimited try-in time allows the patient to take as much time as required for try-in. I proceed only when they are happy with the shade. The patient “buys the shade” before the veneers are bonded. With Accolade PV, the final
shade is exactly the same as the try-in. No more free remakes!
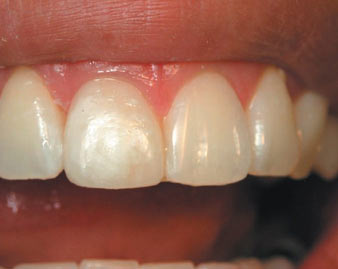
Before treatment of non-vital right central incisor. Tooth preparation for veneer.
Try-in with two shades of Accolade PV Try-in Composite (Light on distal, Translucent on mesial).
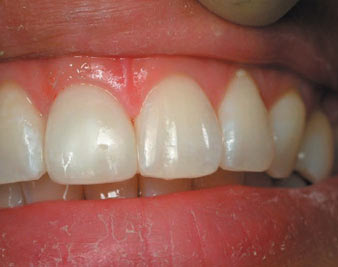
After treatment, bonded with a 50/50 mix of Accolade PV Light and Translucent.
After treatment, bonded with a 50/50 mix of Accolade PV Light and Translucent.
A new esthetics lab from a well known, master technician
Many of you know Laura Kelley. Laura is the first woman and dental ceramist to serve as President of the American Academy of Cosmetic Dentistry. Laura has opened a new dental lab in San Ramon, CA., known as LK Dental Studio. The lab phone number is (866) 550-3522. I can hardly wait to give this lab a try.
Recently asked Bondodontics questions
"I am having trouble with bonding incisal edges. I have one patient in particular, where we have tried to add to a small mesial incisal chip on # 7 on 2 occasions. I am using Prelude as directed and placing Estellite Sigma as my primary composite. I placed a small bevel (1mm) on the facial and lingual cavo surface margins and adjusted occlusion in CO and all excursive movements and it has failed both times. I would appreciate any tips you could recommend."
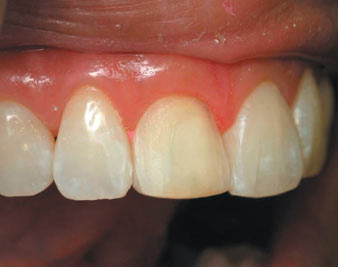
Your choice of materials seems fine. I trust that you used Prelude with the phosphoric etch option, which is best for enamel (etch, wash, dry, #2 Prelude, dry, cure). The probable reason for failure is the mismatched mechanical properties of enamel and composite. For that reason, I have recommended using porcelain or pressed ceramic on incisal edges, especially after one composite failure. The following is an example of a “sectional veneer” on an incisal edge. These can be bonded to either enamel or porcelain, functioning as a porcelain repair. They almost always work for the long haul, presumably due to the similar mechanical properties of porcelain and enamel.
Here is an example. This sectional veneer was bonded with a flowable composite (Danville’s microfilled Aria) and Kuraray’s Photo Bond.
"I will be seating ten maxillary porcelain veneers on a tetracycline patient. This is a retreatment of direct composite veneers. The severely stained areas (mid tooth), had been prepped and composite placed to mask the staining, but caused the veneers to have a light purple show through. I removed the composites and masked the areas with opaque and A-2 composite. The new veneers will not have to be masked out as dramatically and a translucent incisal is now possible."
That sounds perfect so far. You are wise to even out the tooth color at the start.
"She has opted for one of the lightest bleach shades. I spoke with the technician and he agreed that a clear, translucent resin cement would most likely be the best luting agent to use."
On that one I definitely disagree. You need some translucency in the veneer itself to give vitality. Excessive opacity in the porcelain makes the veneers look terrible. Where the opaquer should go is behind the veneer. I highly recommend Accolade PV with the Try-In Composite system. There are 3 opaqued whitish shades which have suffi ced for me when I needed blockout. There are yellow and brown tint shades which I only rarely need. Since the fi nal shade is determined mostly by the porcelain itself; you usually need neutral blockout behind the veneer. For the very white shades which many patients currently demand, the whitish shades of Accolade PV work extremely well. The Accolade PV shades are very close to what DaVinci Lab uses in their veneer bonding system, which would also be a good choice. (For an extreme blockout of the entire tooth, we pre-opaque the tooth prior to taking the impression, using Accolade PV White Opaquer.)
"I am not sure if a dual-cure resin cement, like Insure, would be indicated. A large portion of the veneer would not be light cured because of the masking and I was
not sure of the autocure time."
If you keep some translucency in the veneer, light cure should be possible. I suggest sandblast of the composite fi ll-in area, etch the entire veneer prep with phosphoric acid, wash, dry, and apply Photo Bond. Photo Bond is a dual-cure and it will convert the Accolade PV to a dual-cure too. (This is not in the Danville Accolade PV instructions; it’s just my observation.)
"I am fearful of dislodgement during cementation. What would be your recommendation for a resin cement in this situation? Would you consider the Light shade Panavia? If so, do you think I should use a bonding agent like All Bond since there is so much dentin exposure? I would really appreciate your thoughts and recommendations. Please let me know if you need any more info."
The Light shade of Panavia is not very white nor very opaque. Better would be to use Accolade PV. One of the shades will have sufficient opacity. Determine the best shade using the Accolade PV Try-In Composite. I must stress the need to keep the majority of the opaquer in the composite, not in the veneer. The lab needs to know
the final shade but you take care of the blockout by using the opaque shades of Accolade PV. If it is a very fine lab, you might ask for a “fog of opaquer” in the deepest part of the veneer. While All Bond 2 is a fine adhesive and a reasonable choice here, for a more optimal bond to the fi ll-in composite, use my secret weapon: Clearfil Activator added to Photo Bond. The enamel bond is about the same as with All Bond 2. In summary: after try-in is complete, pumice the tooth to rid it of try-in materials, wash, dry, sandblast, phosphoric etch, wash, dry, apply Photo Bond mixed with Activator, dry, place veneer loaded with Accolade PV, light cure as usual. (Should you need advice on use of Activator or other Clearfi l products, I suggest calling Tin Man Dental and ask for Ryan, the Wizard. (800) 554-6394. Ryan knows
Danville stuff too.)
"Is Gluma still the answer to elimination of sensitivity?"
Gluma Desensitizer (Heraeus Kulzer) continues to work well with total-etch adhesives (those which use a separate phosphoric acid etching step). You may be interested to know that Danville’s MicroPrime G is a clone of Gluma (35% HEMA and 5% glutaraldehyde). CRA’s November 2007 Newsletter recognized that MicroPrime G is priced about 80% less than Gluma. Wow, what a savings.
Danville has another version of Microprime, known as MicroPrime B. (Take a guess at who “B” is). This patented version uses benzethonium chloride in place of the glutaraldehyde. The trade off is less soft tissue burning with B but somewhat less disinfection than with G. In terms of sensitivity reduction, I think the performance
is about the same for both versions. With self-etch, there is no harm in using MicroPrime but sensitivity elimination should not be an issue.
(In reference to zirconia) "You won’t believe what Lab … (a lab back east that does the Zirc Maryland-style frames) said to Art’s lab tech. Quote: ‘”Did you glaze the intaglio?” Apparently they advocate glazing the intaglio and then etching it with hydrofluoric acid. Questions come to mind: How thick is the glaze layer? Is it possible to remove (inadvertently of course) the glaze with overzealous acid etching? Dumb question but necessary to ask from my standpoint. Who has done long-term studies on this technique (longer than 6 months)? Please E-Mail me the German study you recently quoted in your lecture."
I am not aware of any long term studies on HF etched glazed layers. As I understand it, there are problems in bonding porcelain to zirconia. So personally I would not take the risk of using that lab’s technique unless the lab can produce adequate studies. The reference I mentioned is: Durability of the resin bond strength to zirconia ceramic after using different surface conditioning methods. Wolfart M et al., Dental Materials 2006;23:45-50. The investigators showed aluminum oxide sandblasting followed by Kuraray’s Panavia F bonds well to zirconia, showing far better adhesion than with Ivoclar’s Variolink II. In addition to Panavia and Bistite, Rocatec and CoJet (ESPE) work but are a lot more expensive than just Panavia or Bistite. So I will leave these expensive methods for our rich European colleagues who seem to love it or perhaps don’t know about the simpler methods. The mentioned research group, associated with Prof. Mathias Kern, has shown similar results with aluminum oxide substrates such as Inceram using sandblast and Panavia. (Kern M and Thompson VP, Bonding of glass infiltrated alumina ceramic: Adhesive methods and their durability., J Prosth Dent 1995;73:240-249.)
"Since getting my Microetcher many years ago, I routinely microetch essentially EVERYTHING that I bond, intraoral as well as extraoral: every bonded filling, every bonded ceramic crown, etc. prior to “total-etching”. Are you aware of any adverse effects of this? Is there any research indicating this improves bond-strength over total-etch w/out microetching? Do you know of any tricks/tips to make this process somewhat less “messy”? I use a wet 2x2 gauze that I open up and arrange in the patient’s mouth “behind” the tooth I’m going to microetch, to act as sort of a barrier to catch some of the abrasive that doesn’t get taken up by the HVE if I’m not using a rubber dam."
The latest ceramics such as alumina and zirconia greatly benefit from Microetching followed by an adhesive as described above. As to other substrates, it just makes sense to bond to a clean surface. Here is some data I have for Panavia F bonds to sandblasted Pentron’s Rexillium III metal. For reference the enamel bond is expected to be about 30 MPa in the same test.
As you can see, sandblast plus Panavia can produce a helluva bond, enough to pull enamel off the tooth (don’t ask me how I know).
Panavia F bonds to base metal:
Polished 6 MPa
701 Bur roughened 18 MPa
Sandblast AL2O3 42 MPa
Many dentists use the dental equivalent of a “shop vac”. Otherwise, I don’t have any specifi c suggestions for dust control other than what you are doing. I can tell you that the next Danville innovation, “hydroabrasion”, that is sand surrounded by a mist of water, will eliminate the problem totally. This new technology is expected by summer.
Why bond alumina or zirconia all-ceramic crowns?
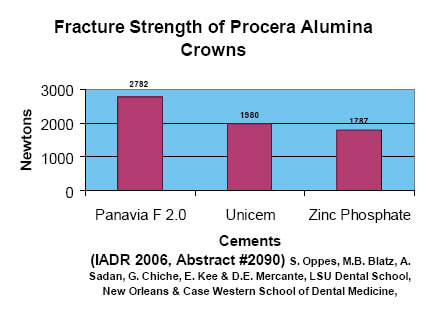
We all understand why bonding is sometimes necessary when there is insufficient retention form. However a less known advantage of using an adhesive such as Panavia on all ceramic crowns is “reinforcement” of the all ceramic restoration. One investigation (see below) reported about 55 percent increase in fracture strength of Procera(Nobel) when bonded with Panavia F 2.0, compared to cementing with zinc phosphate. A weaker “self-etching adhesive”, Unicem (3M / ESPE) provided only about 10 percent strength increase over zinc phosphate, while exhibiting much increased microleakage compared to Panavia F 2.0.
Cerec bonding to powdered or sealed dentin
One common question concerning Cerec bonding is whether or not the powdering step causes loss of bond strength. The powder is needed for taking an optical impression. I have not seen any advice on this subject from Sirona Dental Systems, maker of Cerec Porcelains, Cerec Liquid, and Cerec Powder.
There are a lot of clinicians that advocate immediate sealing of prepared dentin. On Dentaltown.com, Dr. John Kanca suggests that Simplicity should be applied to the tooth prior to Cerec Powder with a second adhesive layer applied after powder removal. Supposedly only his particular method and dental adhesive will work. He claims the adhesive manufacturer has reported laboratory data to show that when using that specific adhesive, powdering does not cause a loss of bond strength.
For what it is worth, Danville has verified that Prelude SE also works with powdering and shows no loss of bond strength.
Dr. Horst Landenberger of Germany, one of my advisors, presented an improvement. What Landenberer suggested is that a thin layer of Clearfil Photo Core should be placed prior to taking the optical impression. He likes to use Prelude SE to bond the Photo Core. Danville’s lab research shows without a doubt that Landenberger’s
method is far superior! In fact, the combination of Prelude SE and Clearfil Photo Core give the highest shear bond strength to dentin Danville has ever seen.
Here is the Landenberger protocol that gave the best bond:
Danville has copies of the complete research report available on request. This research may be very useful even if you don’t do CAD/CAM restorations. Prelude SE in combination with Photo Core may well produce the ultimate core buildup. For the final bond, I would prefer to use Panavia rather than Maxcem.
Danville Materials Tel: 800-827-7940.
There are a lot of clinicians that advocate immediate sealing of prepared dentin. On Dentaltown.com, Dr. John Kanca suggests that Simplicity should be applied to the tooth prior to Cerec Powder with a second adhesive layer applied after powder removal. Supposedly only his particular method and dental adhesive will work. He claims the adhesive manufacturer has reported laboratory data to show that when using that specific adhesive, powdering does not cause a loss of bond strength.
For what it is worth, Danville has verified that Prelude SE also works with powdering and shows no loss of bond strength.
Dr. Horst Landenberger of Germany, one of my advisors, presented an improvement. What Landenberer suggested is that a thin layer of Clearfil Photo Core should be placed prior to taking the optical impression. He likes to use Prelude SE to bond the Photo Core. Danville’s lab research shows without a doubt that Landenberger’s
method is far superior! In fact, the combination of Prelude SE and Clearfil Photo Core give the highest shear bond strength to dentin Danville has ever seen.
Here is the Landenberger protocol that gave the best bond:
- Prepare tooth.
- Apply primer (Prelude Primer), air dry, and apply bonding agent (Prelude Adhesive), dry and light cure.
- Apply thin (< 1 mm) layer of Photo Core and light cure.
- Apply powder.
- Air abrade composite with 50 aluminum oxide to remove powder.
- Silanate (Danville’s S-Bond) composite surface.
- Reapply Prelude Adhesive, air thin and light cure. Apply activator (Link) and dry.
- Cement (Maxcem) freshly milled restoration.
- Light cure margins.
Danville has copies of the complete research report available on request. This research may be very useful even if you don’t do CAD/CAM restorations. Prelude SE in combination with Photo Core may well produce the ultimate core buildup. For the final bond, I would prefer to use Panavia rather than Maxcem.
Danville Materials Tel: 800-827-7940.
